In one click, you can now install a cloud file sharing service — with a set of features that rival not just Google Drive, DropBox, and iCloud, but also Skype and FaceTime — at Gandi.
Introducing Nextcloud, the open-source application for file hosting and sharing
File sharing on the cloud is virtually a requirement these days for just about any kind of online work you might be doing, whether for business or for your own personal pleasure.
Being able to save your smartphone photos, synchronize your documents accross all your devices, share photos and videos, even streaming videos, is crucial, especially as remote work becomes a part of everyday life.
Nextcloud either integrates these features or provides a platform on which apps that offer these features can run on your own hosted space. And the software is both free and open source, meaning that when you use it, you won’t have to sign away the rights to your data or see monetized ads.
Nextcloud has not only become an alternative to the existing, well-known cloud file storage options, but an entire suite of tools that can help you efficiently manage your professional or personnal life.
What’s more, with Nextcloud on Simple Hosting, you own your data, on your own hosting. It’s not centralized on some single database but you can replicate your data (if you wish) on all your connected devices.
One-click installation on a Simple Hosting
For a few years now, Gandi has offered one-click installation of the popular CMS WordPress. Now we’re proud to open up the possibilities of NextCloud to the wider world by offering one-click installation of NextCloud.
If you want to get going, here’s how:
1. Choose the Simple Hosting instance size you want to install nextcloud over
Nextcloud is an application that requires quite a lot of resources, which is why we strongly recommend installing it on a Simple Hosting instance that’s at least a M-sized.
If you intend to use Nextcloud apps (extensions), or if you plan to have several users connectly simultaneously, you should consider size L or XXL.
But you can start with a size M and upgrade the size of your instance later if need be.
2. Choose the domain you want to use
First you need to choose the domain name you want to use.
If you don’t have a domain name at Gandi yet, register one here:

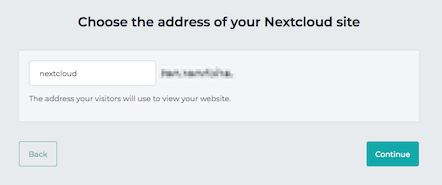
3. Choose the address of your Nextcloud site
Then, choose the address of your Nextcloud site. This will be the URL you use to access it.
3. Check out!
Then check out! Your Simple Hosting instance will take a moment to generate, but once it’s done, you can create your admin account at the address you choose in step 2.
That’s all it takes!
Check out the apps available that you can add to your Nextcloud: https://apps.nextcloud.com/
4. Finish the installation and configure your Nextcloud
Once connected, you will have to choose login credentials for the administrator account. It will take a few minutes again to finalize the configuration of Nextcloud but once it’s done, you will have access to the Nextcloud interface.
You are now free, and able to configure acces for your familly or colleagues by creating new users, and to install and use Nextcloud client applications on your PC and/or smartphone.
You can also extend the possibilities of Nextcloud thanks to the numerous “apps” available.
So that you can install:
Talk: add chat features and also videoconferences. (be sure you have a L or XXL sized Simple hosting for this)
Calendar/Contact: if you want to synchronize your events and contacts
Many more applications are available…
However not all of them are compatible. For example, Collabora (Office-like extensions) require external installations, and are not natively compatible with our installation of Nextcloud on Simple Hosting.
Create my Nextcloud on Gandi Simple Hosting
Tagged in Domain names