UFW (for “Uncomplicated FireWall”) is a command line, simplified configuration tool from Netfilter. Using it is easier than the iptables tool and was designed with this in mind.
You can find the complete documentation on Ubuntu’s official wiki page.
Before getting started implementing Firewall rules with UFW, it’s imperative that you take the necessary steps in order to ensure access to your VPS’s console and to first have verified that it works, since if you should have a problem with UFW, you may find yourself unable to access your own server via SSH and no way to fix it.
So, first of all, follow the procedure for getting access to your console that you can find on this page in Gandi’s documentation.
Once you are sure that your console will allow you to access your system as the root user, you can then run the following command:
sudo apt install ufw(N.B.: this is already installed on the latest versions of Ubuntu)
If it’s not already the case, activate IPv6 management by changing the “IPV6” value to “yes,” in the configuration file “/etc/default/ufw”:
sudo vi /etc/default/ufwThen, make this modification:
IPV6=yes
Define a default policy, which in our case means denying everything incoming and allowing everything outgoing:
sudo ufw default deny incoming
sudo ufw default allow outgoing
And allowing SSH connections:
sudo ufw allow sshIf you had already configured your SSH service so that it’s responsive on a port besides port 22, for example, port 1022, use the following command:
sudo ufw allow 1022Authorize http (port 80) and https (port 443) access if your web service is hosted on your server, either with:
sudo ufw allow http
sudo ufw allow https
or with:
sudo ufw allow 80
sudo ufw allow 443
It’s possible to allow ranges of ports and protocols as well:
sudo ufw allow 6000:6007/tcp
sudo ufw allow 6000:6007/udp
You can allow access for a specific IP address, for example, you can allow the IP source 46.226.107.174 to access whichever destination port:
sudo ufw allow from 46.226.107.174Or allow a specific port:
sudo ufw allow from 46.226.107.174 to any port 22On the same subnet:
sudo ufw allow from 37.1.232.0/21And for a specific port, for example, port 3306 for mysql:
sudo ufw allow from 37.1.232.0/21 to any port 3306It’s possible to define a rule for a specific interface, for example eth0:
sudo ufw allow in on eth0 to any port 3306And you can deny access with “deny,” for example, to deny access to a service, you would use:
sudo ufw deny httpOr to deny access to requests from a specific source IP:
sudo ufw deny from 46.226.107.174Now, to display the rules implemented in order to remove one, use:
sudo ufw status numberedThis will return the rules in place associated with a number, for example:
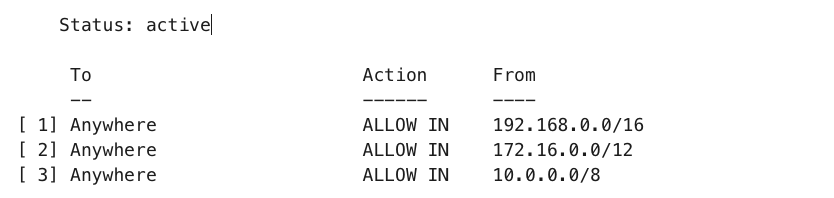
Deleting a rule can then be done by indicating the number of the rule being deleted, for example:
sudo ufw delete 3This will delete rule number 3.
To delete another rule in the same way, consider displaying the list again in order to make sure the numbering of rules is up to date.
The alternative to using rule numbers is to specify the actual rule to delete.
For example, if you want to delete the rule “allow http,” you can use the following:
sudo ufw delete allow httpIf you also specify the rule by indicating the port used rather than the name of the service.
For example, for http, use the port 80:
sudo ufw delete allow 80At any moment, you can check the state of UFW with this command:
sudo ufw status verboseWhen everything seems right, you can active UFW with:
sudo ufw enableIf for some reason or other you want to deactive UFW, run:
sudo ufw disableThis will deactivate the rules that you have created with UFW.
To reactivate UFW and the rules you created for it, launch ‘sudo ufw enable.’
Finally, if you have already configured UFW rules but should you decide to start again, you can use the reset command:
sudo ufw resetThis will deactivate UFW and delete all the previously defined rules.
Using “reset” will allow you to start over as though you’d just installed it.
To go further, see also:
UncomplicatedFirewall on the official Ubuntu wiki
Tagged in Cloud