Gutenberg is the next evolution in WordPress, introduced in December 2018. The interface has been completely redesigned to use a system of “blocks,” to construct a post. Now that we’ve been using WordPress’s blocks editor for a couple of years, we’ve listed the 7 features that make our daily publishing easier on this very blog.
WordPress Gutenberg is a block-based editor that was launched December 6, 2018. It replced the previous WordPress editor (which today is called the “Classic” editor or TinyMCE). Unless you choose to deactivate it, WordPress Gutenberg is the default editor for all WordPress sites. In other words, if you’ve used WordPress since 2018, you’ve used Gutenberg.
WordPress’s developers wanted to make publishing on the internet more accessible to a wider range of users. So it’s no coincidence the project was named Gutenberg, referring to the printer and inventor of the printing press, which made it possible for the general public to access knowledge and information.
WordPress Gutenberg is a tool that’s primarily intended for those who are not web professionals, or at least are not technically oriented. Content creation with WordPress Gutenberg is based on blocks. A paragraph is a block, an image is a block, a form is a block, a button is a block, etc. The integration of external content is also made extremely easy. Tweets and YouTube videos can be integrated in a few seconds using the embedded content block.
The WordPress Gutenberg interface
The WordPress Gutenberg interface is has been refined so that users can concentrate on content. There are 3 main parts of the interface:
Content: The article takes up almost the entire screen, enabling you to have some idea of what the public version (front) of your site will look like
Uppertoolbar: The very discrete toolbar along the top of the page helps you insert new blocks, cancel or redo an action, and access other essential settings
Righthand column: the column on the right has two tabs. The Post tab lets you configure your article’s settings (categories, tags, featured image, etc.). The Block tab shows settings applicable to the block selected (font size, background and text color, block alignment, etc.)
To add a new block and to integrate content on Gutenberg, there is a + icon under all existing blocks. The six most used blocks will display by default, but a search bar gives you access to all types of blocks.
There are 5 block categories.
To move blocks, up and down arrows show up when clicking the block that you can use to easily move the blocks. For more major rearrangement, you can use the drag-and-drop option by using the “six points” icon to the let of the arrows.
People with a more advanced level of technical competency can, of course, dig around a bit more in the code by showing the HTML version to access the code.
7 WordPress Gutenberg features that you should test
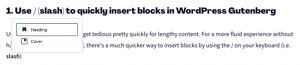
1. Use / (slash) to quickly insert blocks in WordPress Gutenberg
Using “+” to insert blocks can get tedious pretty quickly for lengthy content. For a more fluid experience without having to leave your keyboard, there’s a much quicker way to insert blocks by using the / on your keyboard (i.e. slash)
After pressing “Enter” to call a new paragraph block, type / then the first few letters of the name of the block you want to insert. In this example, we’re creating a Title block.
You’ll see a list of all the blocks that match your request. Navigate using the arrows and select the one you want by pressing “Enter.” And the new block will be inserted!
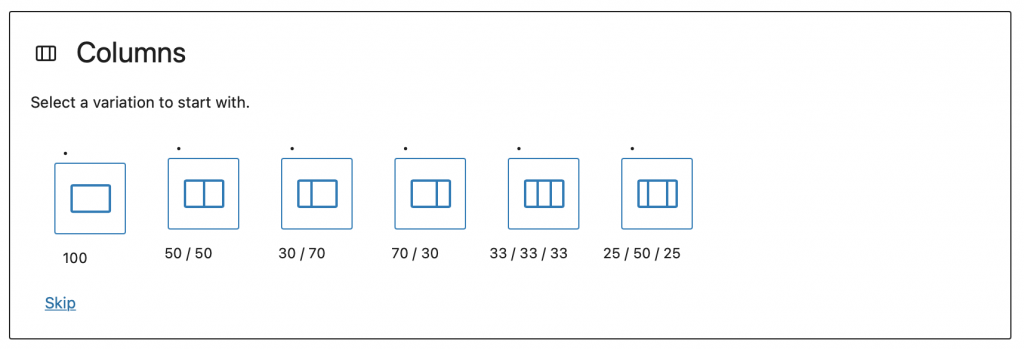
2 . Create text columns with WordPress Gutenberg
You might need to create a page layout using two or more columns, with a paragraph of text. The “Columns” block makes that very easy. You can choose the structure and the ratio of the columns.
Here we’ve chosen the 50/50, two column layout. With this layout, you’ll see two equally sized columns with + icons in them.
To insert content, you can click on the + icon to open the interface to insert blocks. Here, we’ve added the “Paragraph” block in each column.
With text columns, you can add any number of text blocks in-line. If you need to add or remove any, there’s a cursor in the “Block” tab of the column on the right. If you don’t see it, be sure to verify that you selected the entire “Columns” block and not just the Paragraph block within your Columns block 😉
3. Use the Markdown format supported by WordPress Gutenberg
Are you maybe used to using Markdown syntax to create content, like most Gandi developers? WordPress Gutenberg supports limited use of this syntax, principally for titles. For example, to insert an H3 title, you just need to type “###” and then press the spacebar. WordPress Gutenberg automatically converts the Paragraph block into an H3-level title.
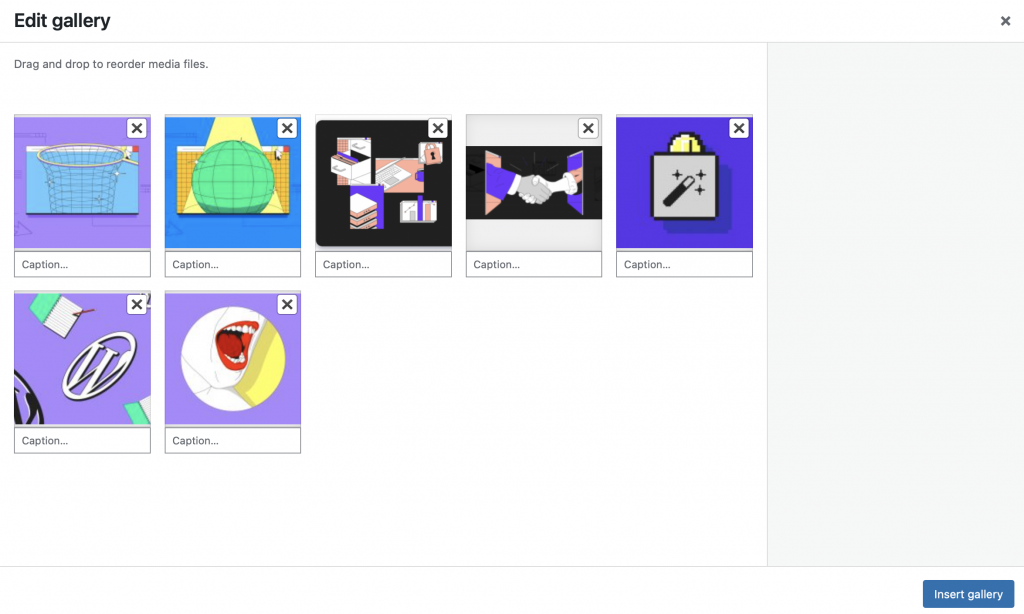
4. Insert a photo gallery (as opposed to inserting photos one on top of the other)
If you need to add a set of images as a gallery in your post (for a slideshow, for example), the Gallery block is for you. Adding a Gallery block works either by uploading images or by selecting images from the WordPress Gutenberg.
Once you’ve made your selection, click on “Create a new Gallery.” An intermediary screen lets you arrange your photos. You can then insert your gallery.
This block’s options let you define the number of columns to display, depending on the number of images that you’ve added to the gallery. Images automatically resize when you adjust the number of columns. Here’s the result of our example above:
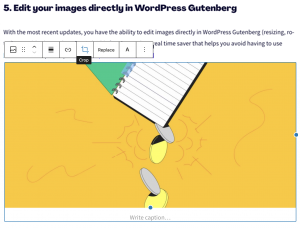
5. Edit your images directly in WordPress Gutenberg
With the most recent updates, you have the ability to edit images directly in WordPress Gutenberg (resizing, rotation, positioning and zoom, etc.). This feature can be a real time saver that helps you avoid having to use Photoshop or another altnerative tool.
Here, we’ll resize a 16:9 image to make it square, without leaving WordPress Gutenberg. We can click directly on the crop icon above the image and choose the “Square” ratio in the drop-down menu. And that’s it!
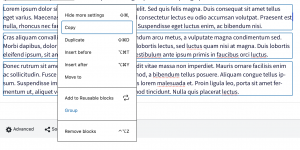
6. Group blocks
Certain users reproach WordPress Gutenberg for being cumbersome to use, since each paragraph is its own separate block. For long articles, it can be difficult to manipulate text. Some prefer to write their posts in a different editor and then only afterwards paste the next into WordPress Gutenberg when it’s ready to go. It is, however, possible to group paragraph blocks.
For example, on the below paragraphs, we didn’t have to use the righthand column to, for each block, indicate that we want white text on a background color. We first grouped the paragraphs.
And in a few clicks, we defined the background color for the entire section.
Lorem ipsum dolor sit amet, consectetur adipiscing elit. Sed quis felis magna. Duis consequat sit amet tellus eget varius. Maecenas tincidunt aliquam cursus. Sed consectetur lectus eu odio accumsan volutpat. Praesent est nulla, rhoncus nec faucibus et, bibendum eu neque. Suspendisse eget luctus enim, ac bibendum nisi.
Cras aliquam convallis sollicitudin. Vestibulum bibendum arcu metus, a vulputate magna condimentum sed. Morbi dapibus, dolor sed aliquet maximus, arcu elit lobortis lectus, sed luctus quam nisi at magna. Duis lobortis eleifend ipsum, sit amet ultrices urna finibus quis. Vestibulum ante ipsum primis in faucibus orci luctus.
Donec rutrum sit amet nunc a malesuada. Cras blandit vitae massa non imperdiet. Mauris ornare facilisis enim ac sollicitudin. Fusce elementum dui id sapien euismod, a bibendum tellus posuere. Aliquam congue tellus ipsum. Suspendisse imperdiet egestas metus, id mattis lorem malesuada et. Proin ligula leo, porta sit amet fermentum ut, aliquet vel diam. Vivamus gravida euismod tincidunt. Nulla quis placerat lectus.
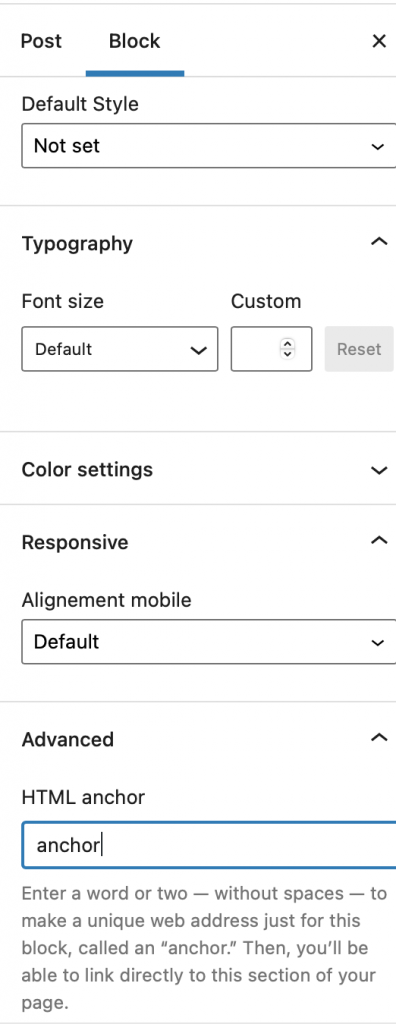
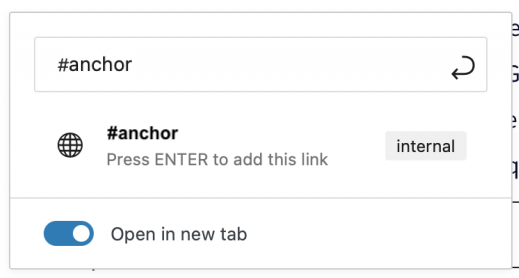
7. Insert anchors with WordPress Gutenberg
Anchors are internal links that link to another place in the same document. It’s what we used in this post’s introduction. Each entry in the summary is clickable and sends you directly to its associated section in the body of hte article. Users, then, can direclty access the section that interests them, without having to scroll all the way down.
Go to the block options (in the column on the right) where you’ll find the section “HMTL Anchor” in the “Advanced” menu. For this seventh feature, the word “Anchor” is our anchor 😉
In the summary, we can then create an internal link towards this anchor by inserting #anchor as the URL linked to. That’s the equivalent of adding an “id” to an HTML element and linking with #anchor as the URL.
Conclusion
Since its launch, WordPress Gutenberg has also evolved and improved its advantages. It’s taken up the challenge of making internet publishing accessible to all. The way of writing is fluid, style modifications are visible directly in the editor, selecting and modifying blocks is very intuitive.
Phase 2 is Full Site Editing, which will enable users to customize and design 100% of their website’s layout. The most highly anticipated advancement is the future collaborative mode, which will probably be in phase 3.
Lastly, from now until [date_utc_date=”2022-06-30 21:59″], you can take advantage of our promo on .blog domain name registrations for to increase your blog’s visibility using SEO.
Tagged inSimple HostingWordpress
This year marks a major milestone for Taiwan’s national domain registry: TWNIC is celebrating its 25th anniversary.To commemorate the occasion, a rebranding campaign titled “.tw: A New Chapter of Trust” […]
The Generation That’s Redefining Branding Forget about the same old, same-old resumes and LinkedIn profiles that are all the same. Gen Z professionals are changing the game when it comes […]
The dash, or more accurately hyphen, is the only special character allowed in a domain name, and the only
way to put a spacer between two words. But should you include one in your domain name?